Tuesday, January 4, 2011

Using MapQuest OSM Tiles in OpenLayers

With the recent launch of Open.Mapquest U.S, people now have one more way to view and contribute to OpenStreetMap data. Among those cool things of new Open Mapquest initiative, my favorite is the look and feel of those tiles generated from OSM data:
image
In my own opinion, it has much better looking than the original OSM Mapnik or Osmarender style. Since the structure of Open.Mapquest tiles are exactly the same as OSM tiles except for the base url, it can not be easier to use them as base layer in an OpenLayers application. Here is how to do it:
1: ...
2: // in place where you use to add OSM layer 
3: // var osm = new OpenLayers.Layer.OSM();
4: // map.addLayers([osm]);
5: 
6: // create a new class for Open.Mapquest tiles
7: OpenLayers.Layer.MapQuestOSM = OpenLayers.Class(OpenLayers.Layer.XYZ, {
8:     name: "MapQuestOSM",
9:     //attribution: "Data CC-By-SA by <a href='http://openstreetmap.org/'>OpenStreetMap</a>",
10:     sphericalMercator: true,
11:     url: ' http://otile1.mqcdn.com/tiles/1.0.0/osm/${z}/${x}/${y}.png',
12:     clone: function(obj) {
13:         if (obj == null) {
14:             obj = new OpenLayers.Layer.OSM(
15:             this.name, this.url, this.getOptions());
16:         }
17:         obj = OpenLayers.Layer.XYZ.prototype.clone.apply(this, [obj]);
18:         return obj;
19:     },
20:     CLASS_NAME: "OpenLayers.Layer.MapQuestOSM"
21: });
22:     
23: var mapquestosm = new OpenLayers.Layer.MapQuestOSM();
24: // map.addLayers([mapquestosm]);
25: ...
This is a screen shot of how Open.Mapquest tiles look like in OpenLayers app
image

Monday, December 20, 2010

Cool feature called “Destination Maps” from Bing Maps

Recently I found this cool feature called “Destination Maps” from Bing Maps, which basically allows you to pick up a location, adjust an extent and then create a map out of it. The real cool thing though is the “sketchy” and “treasure” map style. BTW you can export the final map as PDF or JPEG format in different size. Here are the two maps I created:

yingqi_home_destination_maps

yingqi_home_destination_maps_2

Looks good, huh? It makes a good poster.

Saturday, November 20, 2010

Hack OpenGeo Styler to work with generic WMS servers

As part of the OpenGeo Suite, Styler is a web based WMS viewer plus SLD editor built upon OpenLayers and GeoExt. Although it uses WMS and SLD protocols, current release of Styler must be coupled with a running GeoServer instance. So it is impossible for Styler to work with a generic WMS server due to the following issues:
  • WMS layers must come from GeoServer instance on the same machine as “/geoserver/wms?”
  • Every WMS layer must have has a WFS feature type at back end which must come from “/geoserver/wfs?”
  • There is no where to configure proxy so it doesn’t work with a remote server
  • Instead of WMS GetStyle, Styler is using GeoServer REST API (not a standard) to load SLD from WMS
  • Instead of WMS PutStyle, Styler is using GeoServer REST API (not a standard) to push and persist styles back to WMS
  • Styler is not using either standard WMS parameter “SLD” or “SLD_BODY” to make stateless change of map styles
  • Styler requires the WMS to support DescribeLayer interface
By briefly looking through its source code, I found it’s not too hard to overcome those issues and make Styler talk to a generic WMS server (e.g. ArcGIS Server) as long as the target WMS meets following prerequisites:
  • WMS must support EPSG:900913 (EPSG:3857 or Esri’s EPSG:102110 is ok but requires a little tweak in OpenLayers)
  • WMS must support GetStyle interface
  • Each layer in WMS must have a WFS feature type at back end in order to get attributes list
  • Each style of a WMS layer must have a SLD definition which can be retrieved through GetStyle
  • Optionally WMS needs to support PutStyle interface if one wants to persist SLD styles at server side
  • Optionally WMS needs to support SLD_BODY to make stateless change of rendering and symbology 
So in this article, I’m going to go through the basic steps to tweak the OpenGeo Styler to communicate with a non-GeoServer WMS:

1. Checkout Styler source code from http://svn.opengeo.org/suite/trunk/styler

2. Build Styler
sudo easy_install jstools
mkdir script
jsbuild build.cfg -o script
After a successful build there should be 4 js files in script folder.
Note: I only found out how I can build it on Linux, and I didn’t try on Windows

3. Setup debug environment for Styler
To launch Styler application simply follow the instructions here. By default, the index.html references merged and compressed js file in “script” folder, in order to modify and debug Styler you will need to reference those uncompressed js files in index.html as below:
1: ...
2: <script src="../styler/externals/openlayers/lib/OpenLayers.js"></script>
3: <script src="../styler/externals/ext/adapter/ext/ext-base.js"></script>
4: <script src="../styler/externals/ext/ext-all.js"></script>
5: <script src="../styler/externals/geoext/lib/GeoExt.js"></script>
6: <script src="../styler/script/gxp.js"></script>
7: <script src="../styler/lib/Styler.js"></script>
8: <script src="../styler/lib/Styler/dispatch.js"></script>
9: <script src="../styler/lib/Styler/ColorManager.js"></script>        
10: <script src="../styler/lib/Styler/SchemaManager.js"></script>
11: <script src="../styler/lib/Styler/SLDManager.js"></script>      
12: <script src="../styler/externals/ux/colorpicker/color-picker.ux.js"></script>
13: ...
Now you should be able to debug into OpenLayers and Styler in browser.

4. Hack the code
You don’t actually need to touch any code in OpenLayers or GeoExt, all changes are within three .js files in Styler itself, which are:
\lib\Styler.js
\lib\Styler\SLDManager.js
\lib\Styler\SchemaManager.js
Code changes in those files are explained in details below.

Code Changes in Styler.js

a. Add three properties for class Styler
1: // right before the “constructor”, and after other properties
2: ...
3: wmsUrl: "/geoserver/wms?",
4: wfsUrl: "/geoserver/wfs?",  
5: proxyUrl: "",
6: ...

b. Within Styler.js replace “/geoserver/wms?” or “/geoserver/ows?” with “this.proxyUrl + this.wmsUrl”, and replace “/geoserver/wfs?” with “this.proxyUrl + this.wfsUrl”. This is to allow user to point Styler to any WMS, either remote or local.

Note: there is one exception though, in method createLayers() you just need to replace “/geoserver/wms?” with this.wmsUrl because WMS layer doesn’t need a proxy to request map image.

c. Avoid using WMS DescribeLayer
1: //locate method:
2: describeLayers: function(callback) {
3:   ...
4: }
5: //Comment out original code and add following chunk of code
6: describeLayers: function(callback) {
7: for (var i=0, ii=this.wmsLayerList.length; i<ii; ++i) {
8:                   config = this.wmsLayerList[i];
9:                   // assume each WMS layer has a backend WFS layer
10:                   this.layerList.push(config);
11:             }
12:             callback();
13:   }
14: //here assumption is that every WMS layer has a WFS feature type at back end

d. If your WMS supports Google Mercator projection as something other than “EPSG:900913”, In method createLayers() you will need to add an extra parameter (e.g. “srs: ‘EPSG:3857’”) when creating each WMS layer
1: createLayers: function() {
2: ...
3:     layers.push(
4:     new OpenLayers.Layer.WMS(
5:         config.title, this.wmsUrl, {
6:         layers: config.name,
7:         styles: config.styles[0].name,
8:         transparent: true,
9:         format: "image/png",
10:         srs: "EPSG:3857"  // EPSG:3857, EPSG:102110 or EPSG:102113 etc.
11:         }, {
12:     }));
13: ...
14: }

e. Pass proxyUrl, wmsUrl and wfsUrl into SLDManager and SchemaManager
1: getSchemas: function(callback) {
2:             this.schemaManager = new Styler.SchemaManager(
3:             this.map,
4:             {
5:               proxyUrl: this.proxyUrl,
6:               wfsUrl: this.wfsUrl
7:             }
8:           );
9: 
10:   getStyles: function(callback) {
11:         this.sldManager = new Styler.SLDManager(this.map, {'proxyUrl': this.proxyUrl});
12:             this.sldManager.loadAll(callback);
13:       }
14: 
15:   initEditor: function() { {
16:   …
17:  this.sldManager = new Styler.SLDManager(this.map, {'proxyUrl': this.proxyUrl});
18:   ...
19: }
20: ...
21: 
22: // Note: the original constructors for SLDManager and SchemaManager takes a single input parameter
23: // but they will be modified to take 2nd input parameters in SLDManager.js and SchemaManager.js
24: 


Changes in SLDManager.js

a. Add an extra parameter called “proxyUrl” right before the constructor
1: // right before the “constructor”, and after other properties
2: ...
3: proxyUrl: "",
4: ...

b. Modify SLDManager constructor to take 2nd input parameter
1: initialize: function(map, options) {
2:     this.map = map;
3:     var layer;
4:     this.layers = [];
5:     this.layerData = {};
6:     this.format = new OpenLayers.Format.SLD({multipleSymbolizers: true});
7:     for (var i=0; i<this.map.layers.length; ++i) {
8:         layer = this.map.layers[i];
9:         if(layer instanceof OpenLayers.Layer.WMS) {
10:             this.layers.push(layer);
11:         }
12:     }
13:     // this is important so user can pass in ‘proxyUrl’
14:     OpenLayers.Util.extend(this, options);  
15: },

c. Overwrite getUrl() so it sends GetStyle request to retrieve WMS SLD defintion, here is an example
1: getUrl: function(layer, styleName) {
2:     var url;
3:     if(layer instanceof OpenLayers.Layer.WMS) {
4:         url = layer.url.split("?")[0] + "?" + "version=1.3.0&request=GetStyles&layers=" + layer.params["LAYERS"];       
5:         OpenLayers.Console.log(url);
6:     }
7:     //TODO handle other layer types
8:     return url;
9: }
10: 

d. In loadSld() method replace  this.getUrl(layer, styleName) with this.proxyUrl + this.getUrl(layer, styleName)
1: ...
2: loadSld: function(layer, styleName, callback) {
3:         Ext.Ajax.request({
4:             url: this.proxyUrl + this.getUrl(layer, styleName),
5:             method: "GET",
6:             …              
7: ...
8: // obviously there may be more than one styles for each WMS layer, 
9: // in this case the first style is always used.
10: 

e. In saveSld() method, replace original code with following to use “SLD_BODY” parameter to make stateless change of rendering and symbology
1: saveSld: function(layer, callback, scope) {
2:     this.layerData[layer.id].style.name = "__internalstyle__";
3:         var sldBody = this.format.write(this.layerData[layer.id].sld, {});
4:     layer.mergeNewParams({
5:       styles: "__internalstyle__", 
6:       sld_body: sldBody
7:     });
8:     callback.call(scope || this);  
9:   }
10: // By using “SLD_BODY” any change to the style is stateless which will not affect other users. 
11: // But if you want to persist modified styles on server side, 
12: // you must use WMS PutStyle operation and also make sure server supports it
13: 
14: 

Changes in SchemaManager.js

a. Add two extra parameters called “wfsUrl” and “proxyUrl” right before the constructor
1: // right before the “constructor”, and after other properties
2: ...
3: proxyUrl: "",
4: wfsUrl: “”,
5: ...

b. Modify SchemaManager constructor to take 2nd input parameter
1: initialize: function(map, options) {
2:             // other code
3: ...
4:             OpenLayers.Util.extend(this, options);
5:        ...     
6:             for(var i=0; i<this.map.layers.length; ++i) {
7:                   layer = this.map.layers[i];
8:                   if(layer instanceof OpenLayers.Layer.WMS) {
9:                         this.attributeStores[layer.id] = new GeoExt.data.AttributeStore({
10:                               //url: layer.url.split("?")[0].replace("/wms", "/wfs"),
11:                           // TODO: need better logic to handle case where this.wfsUrl is empty or must be derived from this.wmsUrl
12:                           url: this.proxyUrl + this.wfsUrl, 
13:                               baseParams: {
14:                                     //version: "1.1.1",    // is there a WFS 1.1.1?
15:                             version: "1.1.0",
16:                                     request: "DescribeFeatureType",
17:                                     typename: layer.params["LAYERS"]
18:                               }
19:                         });
20:                   }
21:             }
22:       }

5. Rebuild Styler and test against a generic WMS server.

So far the OpenGeo Styler has been hacked to communicate with a generic WMS server. To test it you just need to pass in the urls for WMS, WFS and proxy into Styler constructor in the original index.html like below.
1: Ext.BLANK_IMAGE_URL = "theme/img/blank.gif";
2: Ext.onReady(function() {
3:     window.styler = new Styler({
4:         baseLayers: [                              
5:             new OpenLayers.Layer.OSM(
6:                 "Open Street Map",
7:                 "http://tile.openstreetmap.org/${z}/${x}/${y}.png",
8:                 {numZoomLevels: 19}
9:             )                                                             
10:         ],                        
11:         wmsUrl:"http://localhost:8399/<WMSServer_endpoint>?",
12:         wfsUrl:"http://localhost:8399/<WFSServer_endpoint>?",
13:         proxyUrl: "http://locahost:8080/openlayers-trunk/ApacheProxyServlet?url="
14:     });
15: });

Some screenshots:

image
Styler load SLD style definition through WMS GetStyle operation
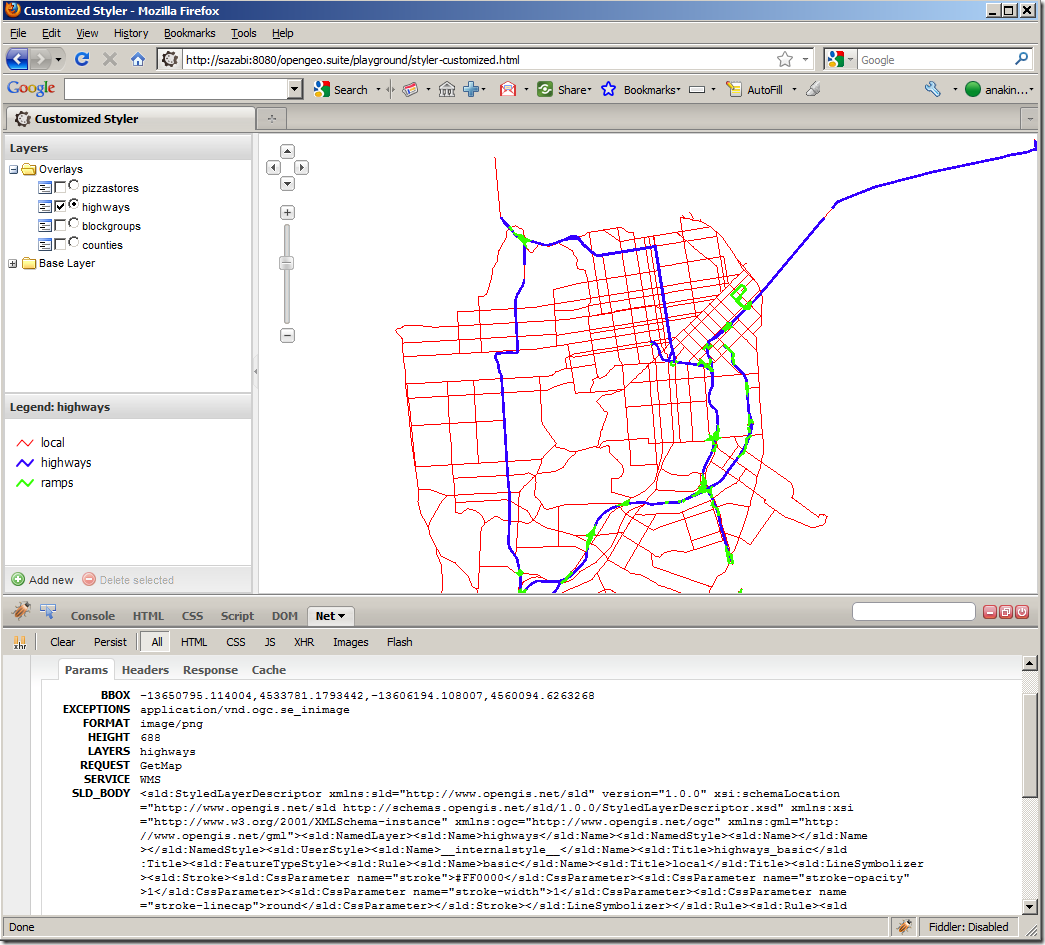
image
Styler changes map symbology through SLD_BODY parameter


6. Things to improve
  • If a layer has more than one styles, provide GUI for users to select 
  • Make OpenGeo Styler to persist SLD styles on server through WMS PutStyle operation

Thursday, October 21, 2010

Using USGS High Resolution Orthoimagery in JOSM

One of CarbonCloud’s recent article pointed me to USGS Seamless Data Warehouse, where many high resolution orthoimagery data is distributed as OGC WMS. It’s a perfect base map option for OSM contributors using JOSM because of the following reasons:
  • The super image quality and resolution (0.25 foot to 2.5 foot);
  • Distributed through open standard based interface (WMS), which can be directly used in JOSM;
  • Compatibility with OSM license makes it legal to be used to derive OSM data on. (features digitized based on Google Maps and Bings are actually considered as derivative work of them, which then is copyrighted)
An obvious disadvantage though is the data coverage because only very limited area are covered by those orthoimagery data. See data availability.
Here are some basic steps to use USGS high resolution orthoimagery in JOSM:
1. Install JOSM and WMS plugin
2. Find the WMS containing the orthoimagery data that covers the area you’re interested in
Here is the list of available WMS services and you can probably tell the covered area by service name. For example, I am interested in making some OSM edits in Redlands, CA, United States, so I pick the WMS USGS_EDC_Ortho_California, in which there is particular layer for Riverside and San Bernardino counties.
Untitled
3. Start JOSM and load the WMS layer in JOSM WMS plugin
After you download the data from OSM in JOSM, you need to register WMS USGS_EDC_Ortho_California in JOSM through WMS Plugin Preference. So just go to Edit—>Preferences—>WMS tab;
image
Click “Add”, and type in a name and url as part of a WMS GetMap request
image
It’s a little tricky for WMS URL because you need to append a few GetMap request parameters manually. It seems to me that JOSM WMS plugin will only automatically populate “BBOX” parameter so you must manually complete other request parameters. Here is the URL that I came up with:
http://imsortho.cr.usgs.gov/wmsconnector/com.esri.wms.Esrimap/USGS_EDC_Ortho_California?VERSION=1.1.1&REQUEST=GetMap&SRS=EPSG:4326&LAYERS=Riverside-SanBernardinoCA_0.3m_Color_Mar_2008&STYLES=&EXCEPTIONS=application/vnd.ogc.se_xml&FORMAT=image/png&BGCOLOR=0xFEFFFF&TRANSPARENT=TRUE&
Notice that I indicate the layer “Riverside-SanBernardinoCA_0.3m_Color_Mar_2008”, which is the area I am interested in.
Note: you should request WMS map in WGS84 (EPSG:4326) because the OSM data overlay on it are all in longitude and latitude.
That’s it, enjoy the armchair mapping!
Below is a snapshot of JOSM with high resolution orthoimagery as base map
image
Same area with Yahoo Imagery as a comparison
image
Is that amazing! Only a little issue of JOSM WMS plugin itself though: if you zoom in after loading the WMS image you need to delete and add the same WMS again to refresh data from WMS, otherwise the image at previous zoom level will simply be resample and used.

This OSM wiki page has a lot of useful information regarding using USGS High Resolution Orthoimagery in JOSM too.

Wednesday, October 13, 2010

IP-based geolocation can also be accurate

I always thought that IP-based geolocation is not as accurate as it should be until quite recently I ran into this HTML5 demo page (Geolocation API is one of the new features in HTML5), and now I have to admit that it was my prejudice.
If you open the demo page in browser and assume you don’t have a GPS device connected to your machine, then all this web app does is to detect your location based on your IP address and add a maker on Google Maps. The source code is also as simple as a “HelloWorld” sample of W3C Geolocation API:
if (navigator.geolocation) {
navigator.geolocation.getCurrentPosition(success, error);
} else {
error('not supported');
}
function success(position) {
// ...non-related code omitted...
var latlng = new google.maps.LatLng(position.coords.latitude, position.coords.longitude);  
var map = new google.maps.Map(document.getElementById("mapcanvas"), myOptions);
var marker = new google.maps.Marker({
position: latlng, 
map: map, 
title:"You are here!"
});
}
function error(msg) {
// ...non-related code omitted...
}

I tried this geolocation demo app twice at my bedroom, one using Firefox 3.6 and the other is using Google Chrome, and below are how the app locates me:

Untitled
Firefox 3.6 Successfully locate me in my land lot

Untitled
Google Chrome is a little off my land lot, but still quite accurate

The results of both are very accurate to where I actually was. That’s just amazing! And I guess the conclusion is that IP-based Geolocation can also be really accurate.

Thursday, August 19, 2010

NASA Earth Observation (NEO) Website is awesome

I recently came cross this NEO (NASA Earth Observation) website that contains a lot of recent and historical satellite image data related to environment and climate change. Unlike most other websites of the same type, NEO’s simple and pretty web GUI design and user experience really surprises me.

neo

Screenshot taken from NASA Earth Observation site at http://neo.sci.gsfc.nasa.gov/Search.html

The dataset hosted by NEO are divided into categories like ocean, atmosphere , energy, land and life. For each of those categories users can browse, search, preview, download, and analysis which is pretty much all you may want to do with satellite data. What’s really awesome is that you can do all of those things in a single ajax-based web page (you see only one screenshot is enough).

Discover data

To find the data, you can select one of the main categories, and then either search or look through the full list. Once it’s found you will be able to see the brief description and preview it in an interactive web map (support zoom in/out)

Download option

Most of the data can be downloaded as PNG, JPEG, GeoTiff, CSV, KML/KMZ directly through NEO home page, and whenever applicable you can also download data in original format e.g. HDF on the same page of data search result.

Web Map Service

NEO also provides WMS access to its data, which is a super plus for those who don't want to download and host data themselves.  NEO’s WMS links:

http://neowms.sci.gsfc.nasa.gov/wms/wms?version=1.1.1&service=WMS&request=GetCapabilities

http://neowms.sci.gsfc.nasa.gov/wms/wms?version=1.3.0&service=WMS&request=GetCapabilities

image

Consume NEO WMS in QGIS

NASA Earth Observation site is just awesome!!!

Wednesday, August 11, 2010

Mysterious “BBOX” parameter in Web Feature Service (WFS)

“BBOX” is a standard parameter defined as part of the OGC Web Feature Service (WFS) keyword-value encoding which is used in GetFeature requests to request features within a specific extent. So “…&BBOX=-180.0,-90.0,180.0,90.0…” means getting all the features in the extent defined by lower corner coordinate (-180.0,-90.0) and upper corner coordinate (180.0,90.0). Not as straight forward as it seems to be to most people, I actually find it quite confusing when trying to answer this question below:

Is it possible to set BBOX to coordinate values in other projection?

The answer to this question depends on whether it’s WFS 1.0.0 (No) or WFS 1.1.0 (Yes), and the yes for WFS 1.1.0 even introduces some more complexity. So in the rest of this article I am going to clear things up based on the definition and statement in following OGC specifications:

BBOX in WFS 1.0.0

First of all, it is a little less confusing for WFS version 1.0.0 that  you CAN’T specify BBOX in coordinates of any other projections. This is based on two facts in specs:

(1) WFS 1.0.0 spec (02-058), section 13.3.3, where it says:

The SRS of the bounding box must be the same as the SRS of the feature type(s) in a request. The SRS of a feature type is advertised by a WFS in the capabilities document. If more than one feature type is specified in a request, the feature types must all be in the same SRS and the BBOX must be specified in the common SRS as well.

(2) In WFS 1.0.0 schema, a WFS’s capabilities response can have only one “SRS” allowed for each feature type.

But I did see people get confused and thus argue about one thing: Can I specify BBOX in EPSG:4326?

Based on the statement above, if a WFS serves out feature types in a non-EPSG4326 then it should be valid and compliant to just reject GetFeature request with BBOX in EPSG:4326. But another paragraph in WFS 1.0.0 spec (same section 13.3.3) seems to indicate a yes on it:

If a request contains a Bounding Box whose area does not overlap at all with the LatLongBoundingBox(s) advertised in the Capabilities XML for the requested geodata object, the server should return empty content (e.g. null feature set) for that element. Any elements that are partly or entirely contained in the Bounding Box should be returned in the appropriate format.

In this case we don’t really have to strictly follow the spec, and I won’t be surprised to see most WFS 1.0.0 implementations supports BBOX in EPSG:4326 no matter what SRS its feature types are in.

BBOX in WFS 1.1.0

Now for WFS 1.1.0, things get a little complicated because of the fact that there is an optional “crsurl” value you can append at the end of the BBOX coordinates to explicitly specify what coordinate reference system the BBOX is in. For example, ”…&BBOX=minX,minY,maxX,maxY,EPSG:900913” means that those min/max X/Y values are in EPSG:900913. Another complexity is that in WFS 1.1.0 capabilities response there can be multiple supported SRS for each feature type.  So based the section 14.3.3 of WFS spec 1.1.0:

The KVP encoding for a bounding box is defined in subclause 10.2.3 of normative reference [15]. The general form of the parameter is:
BBOX=lcc1,lcc2,…,lccN,ucc1,ucc2,…uccN[,crsuri]…


…If the crsuri is not specified then the 2-D coordinates shall be specified using decimal degrees and WGS84 as described in [15].

Note: The WFS spec is reference OWS 1.1.0 spec as [15] here

Here I can actually get two conclusions:

(1) You can specify BBOX in any coordinate reference system as long as you provide a “crsuri”.

Although not described in spec, I would believe you will get correct and useful response only if you request one of those supported coordinate reference system listed in a WFS’s capabilities.

(2) If “crsuri” is missing, then the coordinate values specified in BBOX should be considered as WGS84 as described in OWS 1.1.0 spec as below:

A WGS 84 bounding box shall be KVP encoded in a corresponding parameter value list, with the ordered listed values for the quantities:
LowerCorner longitude, in decimal degrees
LowerCorner latitude, in decimal degrees
UpperCorner longitude, in decimal degrees
UpperCorner latitude, in decimal degrees
crs URI = “urn:ogc:def:crs:OGC:1.3:CRS84” (optional)

In another word, if you set BBOX parameter in request without a “crsurl”, the BBOX value should always be in syntax “min_lon, min_lat, max_lon, max_lat”.

EPSG:4326 versus. CRS84

Now one finally thing people get confused very often is the order of longitude and latitude they should put in BBOX parameter for EPSG:4326 and CRS:84. Originally and as always, official EPSG:4326 defines coordinates in order of “latitude” followed by “longitude”, but unfortunately almost everyone speaks and uses the reverse order as “longitude” followed by “latitude”, which is why old spec like WMS 1.1.1 and WFS 1.0.0 also uses this order for EPSG:4326. But in most recent specifications OGC is trying to fix this common mistaken usage of EPSG:4326 by creating a brand new CRS:84, which based on my understanding is identical to EPSG:4326 except that it defines coordinates in order of “longitude” followed by “latitude”. So as far as WFS goes, always follow the rules below:

For WFS 1.0.0, uses EPSG:4326 and always set BBOX coordinate values as “longitude” followed by “latitude”. For WFS 1.1.0, specify coordinates in BBOX as longitude followed by latitude if you’re setting CRS:84 as the coordinate reference system for BBOX (e.g. “…&BBOX=–180.0,-90.0,180.0,90.0,urn:ogc:def:crs:OGC:1.3:CRS84…”), or set it the other way if you’re setting EPSG:4326 for BBOX (e.g. “…&BBOX=-90.0,-180.0,90.0,180.0,urn:x-ogc:def:crs:EPSG:6.9:4326…), but again if you’re omittng “crsuri” at the end please always stick to the order where longitude is ahead of latitude.

Summary

“BBOX” parameter looks easy and straight forward to use, but it also gets complicated when different versions of WFS implementations and EPSG:4326/WGS84 are involved. Hopefully this article clear things up a little.